
M48TANKER
Members-
Content count
609 -
Joined
-
Last visited
Posts posted by M48TANKER
-
-
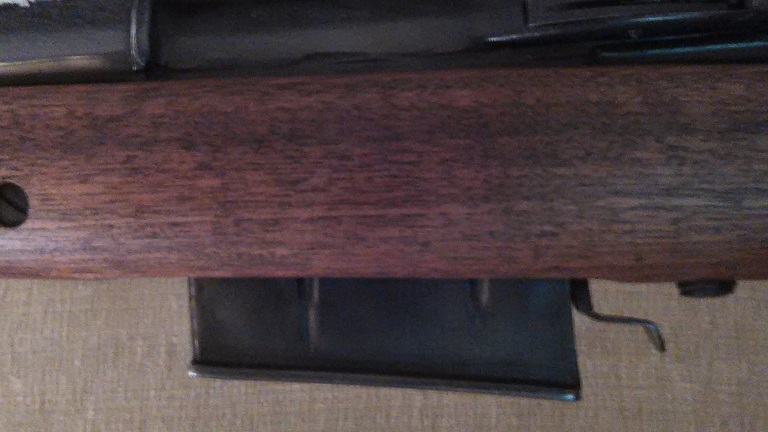
I think you have discovered the culprit: The Magazine Door is somehow restricting the action of the follower trying to present the last round. The magazine door must be bent out of shape or warped so that it is rubbing on the magazine housing.
I can think of a few things to check and perhaps adjust. Check the rear end "wall" of the magazine to be sure it's straight and not bent in anywhere. Check the magazine door where it's touching the rear wall of the magazine....in your pictures we can see a small shiny/silver looking spot where it obviously touches or rubs. Also there is the possibility that the magazine door itself is warped... inward at the back and outward at the front causing the cartridge to hit the magazine door at the back sooner than it reaches near the front. Could the magazine door spring have been bent excessively at some time.
I can imagine any of these being contributing factors. So if the rear wall of the magazine is pushed in a little bit...push it back out a little.
If it appears that the magazine door has been warped from perhaps being pushed in too hard sometime...take it out of the gun and bend it out so it won't put pressure on an approaching round. The door should return to the outer, resting position when it returns from being depressed during loading.
If the magazine door is rubbing against a straight rear wall...remove some material from the rear edge of the door where that shiny spot is appearing. We have to free up that door so it moves freely in and out under just the spring pressure of the magazine door spring. Flatten the door spring out just a bit if you have to.
When you explained about prying out the magazine door 1/16 to 1/8 and that allowing the cartridge to advance into position...that must be made to happen without having to pry on it with a tool.
-
Quoting: Bad news: last round still needs some coercion in getting seated a little higher to get picked up.
It's possible that your magazine spring is indeed a bit weak. I would remove the magazine from the rifle, fill the magazine, and then watch and listen as each successive round is pushed to the top. Check for any rubbing or scraping of the magazine follower on the parts inside the magazine.
I've never compared the shape of the magazine followers, so I can't say how "straight" they are supposed to be. I'd assume that the follower should closely resemble the shape of the cartridge? That would present the cartridge to the bolt aimed straight at the chamber. (any experience with the "follower" out there?)
Good luck...keep us posted!
-
43 minutes ago, camstuff said:M48Tanker always has great advice! and with details. Always like reading your comments.
Thanks camstuff!
 It's nice to be appreciated. Plus I'm always open to correction if I leave something out or if I need to be educated. That being said, I was a bit concerned about my description of the parkerizing process. Different folks have different ways. Some people use a "pre-heated" rinse/bath just before dropping parts in the "Park" tank. Some go right from the park tank to the oil bath without a rinse. If you get into parkerizing, study all the info and then make your own decision about what seems best to you. Once a gun has been parkerized, I treat it like it needs an additional through cleaning and a new break-in period. There are as many opinions about lubrication and the right oil to use, as there are folks with the oil can in hand. I don't think you can go wrong with a tried and true light gun oil like Hoppe's or Rem-oil, "CLP" etc. I'm likely to use the military "LSA" on most of my guns.
I really learned my lesson on that amber-tech. (my opinion)
-
cvgresch,
Here are my thoughts:
Usually part of the preparation for parkerizing is sand-blasting or some form of abrasive media blasting. Then all the blasted parts should be thoroughly cleaned of all blasting media residue...with emphasis on THROUGHLY! I rinse very well with a strong flow of water and blow dry with compressed air. The parts should be immediately placed in the parkerizing tank before the bare metal begins to "flash rust"...which can happen in a matter of minutes. Once the parkerizing process is completed, the parts should be throughly rinsed again, blown dry and soaked in oil. Hopefully all of this was done.
To me most of your parts look very clean, but not very oily. I do think your mainspring tube could use some more cleaning inside and polishing, along with the mainspring, follower, and buffer. This might help to increase the amount of forward pressure available to cycle the action and to chamber, then extract a round. Have you measured your mainspring? lt must be at least 12 inches long, NO LESS...and you can't cheat by stretching it just that last 1/4 inch.
What I'm trying to emphasize is that the weapon must be clean and the parts slick as ice in order to function properly. The entire gun should be disassembled including the fire control group, magazine parts, inside the mainspring tube, all bolt parts, and also polish the chamber of the barrel. The goal is to eliminate every last bit of friction that you can. I would like to see the mainspring tube, below, not only clean but shining like a mirror. As well the follower and buffer. Anywhere grit can hide, or mating parts can get sticky with old grease.
If you have access to a "sonic cleaner" you might be able to clean some groups of parts, like the hammer/trigger/disconnector/bolt open lever, aka: "firecontrol group"...without complete disassembly? But I don't have a sonic cleaner yet so I just take it all apart. From what we can see of the magazine, fire control group, etc. the assemblies appear to be clean, but are they SLICK and OILY? What about the "innards" (Jed Clampett) which we can't see? Are the surfaces clean which contact each other, the pins in the fcg, the mainspring tube, the INSIDE of the upper receiver, the insides of the sear housing where the trigger pivots, the hammer pivots, the sear travels, and the bolt hold open rocks? Rough surfaces and friction are your opponents.
(And yes,
 really good close up pictures can emphasize even a slight build up of crud.
 )
)
.thumb.JPG.5dc0d08d661ab7ec13ea9f889c3e6e32.JPG)
.JPG.2c68ea555b5e635da486c43c66c64bc6.JPG)
.thumb.JPG.02538b995e12df25238e71e0131e0445.JPG)
 SHINE ME UP PLEASE...WAAAAH
-
8 hours ago, maconners said:You should try to determine the type of glue used on the stock extension. Heat works well to soften epoxy but you might want to cut off all but a thin layer of wood from the extension so you don't have to heat a thick section and possibly burn the stock. If hide glue was used,heat and moisture will soften it. Be sure to find position of recoil tube plug before cutting.
I wish I'd said that
-
Please let us know what you find will weaken the glue. Perhaps a heat gun? Is the top of the butt stock inletted (and now probably filled in too) for the upper "L" shaped tang of the original butt plate?
-
Hey Tater!
In my humble opinion, the rear portion of your butt stock has been added. Perhaps to accommodate the eye relief needed for the scope. If you look at the distance from the sling swivel to the butt plate, you will notice that it's extraordinarily long...and more in keeping with the placement of an original.
Of course the difference in the wood grain and the curved shape of the metal butt plate indicates this as well. If you decide to keep the scope you may want to keep that extra length. If you try to return the rifle to a more original configuration, you'll want to very carefully remove that couple of inches on the end of butt stock.
-
I'm surprised that no one bid
-
Hello cvgresch,
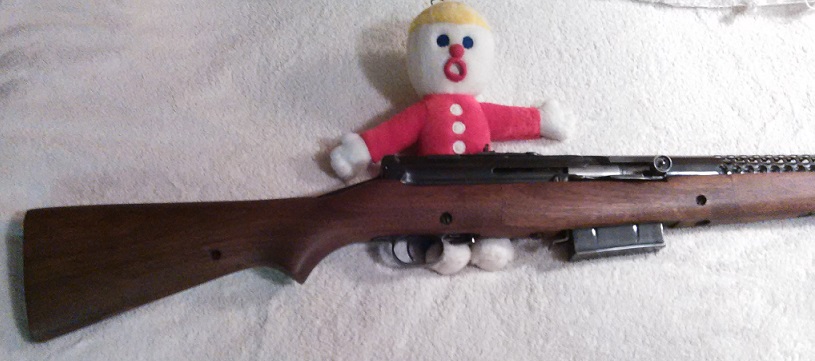
Welcome. That's a very clean rifle. No doubt it's been reconditioned by someone. The butt stock is a great looking and great fitting replacement. The rifle looks so good that I'd bet it's been refurbished by Miltech. They do an outstanding job.
Your pictures show that the magazine door spring is installed upside down. The larger section with the small 90 degree lip bent on it, goes toward the top. When it's toward the bottom that bent lip is getting in the way of those last couple of rounds.
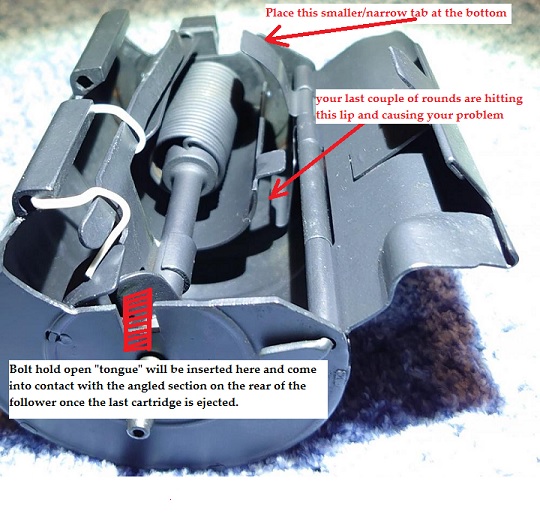
When re-installing the magazine, make sure that you get the bolt hold open "tongue" inserted properly into the rear of the magazine. You'll have to push the follower inward to about the position you show it now in your pictures.
I agree that the barrel has also been replaced but it may be possible that the JA with out punctuation, is indeed a Johnson Automatics produced barrel. Johnson did make barrels for other manufacturers. Someone please correct me if I'm wrong. I know that Joe Scott will be able to tell you for which firearm the barrel was originally made, based on the "offsets" for the front sight and bayonet lug and this superfluous groove.
I hope that I've got all this info right.
-
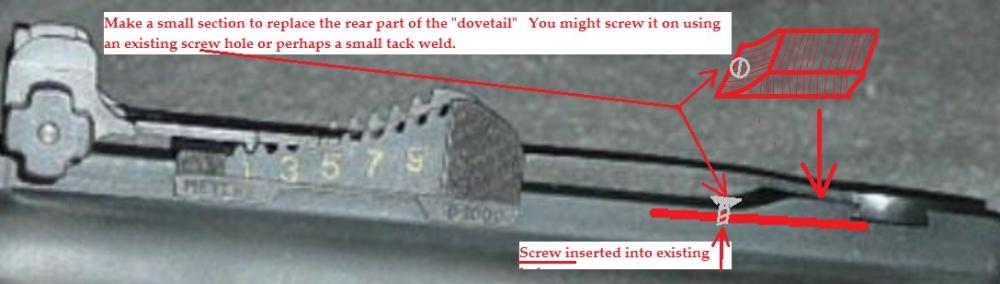
15 minutes ago, Tatereater said:Thank you for the diagram. It is definitely worth a try.
You are certainly welcome! If you don't have access to a milling machine, you could use a dremel tool and take your time.
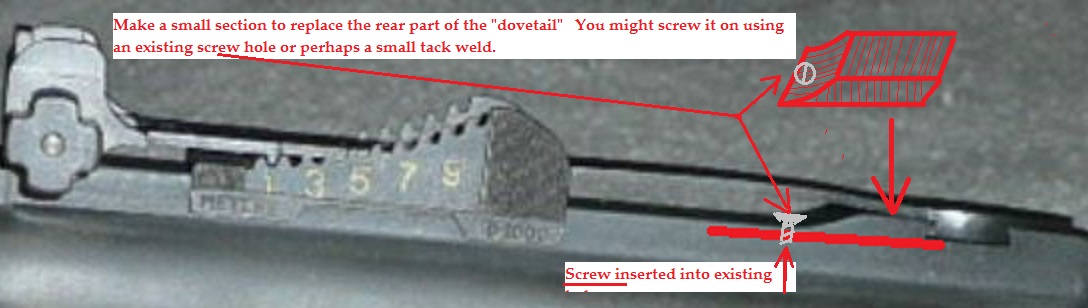
Joe suggested using a screw in an existing hole and some type of epoxy. You sure couldn't hurt the receiver that way. A good TIG welder could do the job too. I would make the dovetail a bit tight and file to fit after attaching it. One of the members here made his own bayonet lug and did an excellent job.
There is a lot to be said about putting the scope back on and letting it be just what it is...A "SPORTER" and enjoy it as is. Most of the guys here eventually get a sporter. Nice Winfield Sporters are increasing in value too.
-
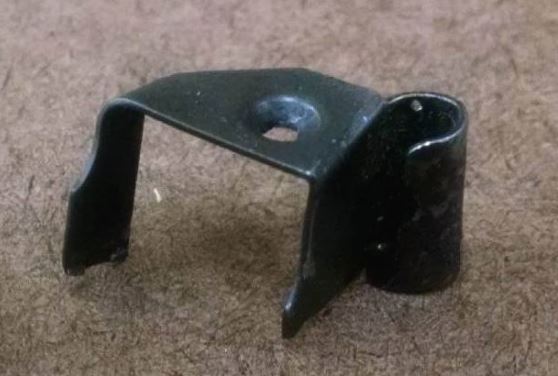
On 1/4/2023 at 7:16 AM, Joseph Scott said:The missing rear sight dovetail can be replaced by attaching a piece with screws and epoxy to secure it from moving when installing new sight. The tricking part is getting the gap correct. Measuring a dovetail involves using two small drills in dovetail and measuring between them. It helps to have another gun to compare. Be sure screws don't interfere with bolt.
I can see that I'm not the only one to think of replacing the rear piece of the dovetail. I actually drew up a diagram to show you my thoughts...but then I hit a wrong key on the computer and lost the message. Since Joe already posted the same procedure, I dropped the idea. Just in case, here it is again. At least this is what I'd try to do.
-
5 hours ago, Rarecat said:Another one popped up on GB, looks parked all over...
It does have a certain "Miltech" appearance. There are several things to which Miltech probably would not attach their name: The magazine door spring is wrong and the front take down pin is either missing or has been replaced by one which is of the short type, sometimes seen on "Sporters" which have a wooden fore arm not notched for the take down pin or retainer.
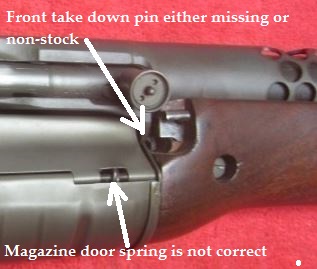
The cartouche of course is highly suspect. I wonder if Miltech would have taken in someone's gun to refurbish, but not to completely return to the proper configuration? Cost may have been a concern for the customer? That barrel shroud is a custom touch which devalues the rifle by half in my opinion. Those custom "cut-outs" actually have no reasonable function. Why on earth would someone do that? Maybe to eliminate some sort of damage to the upper part of the shroud? Returning that shroud to original configuration would take skill and patience. So to me, the shroud is the most damaging to the value. Miltech would NOT have left out that front take down pin! That could be dangerous. Certainly they would not attach their company name to the rifle and put it up for sale.
Miltech's web site is here: https://www.miltecharms.com/index.htm
-
-
Definitely a reproduction.
-
I think someone got a potential bargain. There was a day when I'd have bid on this gun. I like re-militarizing old Winfield Sporters. The buttstock definitely has potential to be reshaped and the foregrip just needs refinishing to match a newly altered buttstock. Re-shaping a buttstock is not really that hard to do. It helps to have a good stationary belt sander and a good eye for proportions. The barrel of course needs a bayonet lug and a military front sight, and of course the rifle would need a military rear sight. About 300.00 worth of parts and the desire to spend a fair amount of time on the woodwork. When you're finished you'll still have a re-militarized Winfield Sporter, but it will look a lot more "original."
I hope the rifle has found a good home.
-
Merry Christmas and Happy New Year to all.
To all old members and new members as well.
Something to Cheer you up:
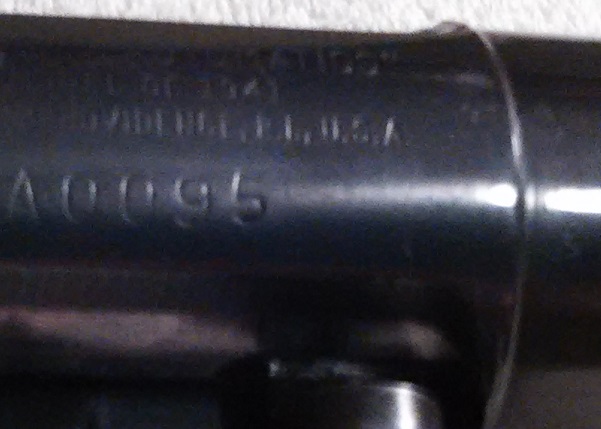
This 1941 Johnson Hunting rifle, serial #A0095 is one of the first 100 to roll off the assembly line. When the soldiers saw it they immediately petitioned the U.S. Marine Corp to adopt this rifle. In trials against the M1 Garand, the Johnson rifle outshot it's competitor but ran out of ammo two rounds too soon, plus there was no metallic "PING" to alert the shooter or the enemy. So Melvin added a "rotary" high capacity magazine. Alas the contract went to the M1 Garand as proposed by President Howard Taft. The first rifle "A0001" was presented to "Mary, Queen of Scotts." Unfortunately the inscribed plaque has subsequently gone missing but fortunately, I found a "Letter of Authenticity" neatly rolled up inside a storage compartment in the butt stock along with a bolt hold open and a firing pin. (Providence: That's my story and I'm sticking to it!)
....And then there is this: A "V" Model Johnson I picked up some time ago. The stock is actually in three sections, jointed together by some of the best woodworking I've seen.
If you don't look too close you'd think it's one piece. The "Vertical" magazine, is in 30.06 and seems to hold 5 or six rounds. This firearm is in excellent condition. It has an "after-market" rear sight and front sight. The butt stock has the military pattern storage holes but with a hard plastic/bakelite butt plate
Serial number A0095, well buffed and highly blued.
-
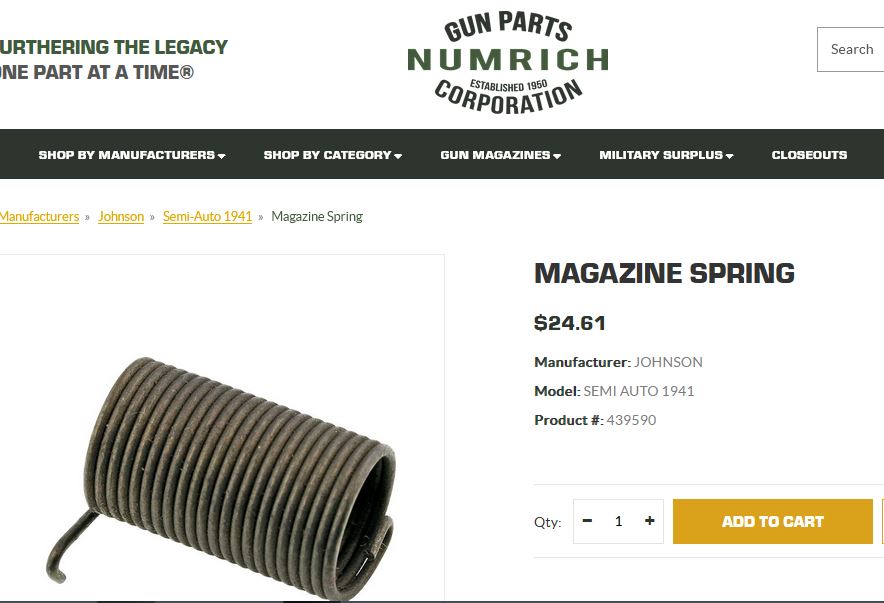
Found this at "Numrich":
-
Pmangelos,
That is a great looking rifle. It looks just right for it's age. Personally, I don't get too upset if a rifle's bore is showing a bit of wear! I love disassembling and reassembling my firearms. You get to know them very well and the process becomes second nature. The magazine problem should not be hard to solve. If there is not some binding or rubbing issue then a better spring should fix it. A new magazine coil spring should not be hard to find. Keep us posted.
Congratulations,
M48TANKER
-
You have probably seen the YouTube videos already:
-
Here is another link to check out: https://www.trapshooters.com/threads/old-western-trap-information-requested.138242/
I also like unique, rare, and odd items!
M48TANKER
-
I don't know who did the carving, but they are similar in style. Maybe some of the other members know?
-
I must realize that there are some here who are not quite old enough to remember Art Linkletter. I love the show: "Kids say the darnedess things."
And his other show: "People are Funny."
-
I found these in my 1941 Johnson picture folder:

-
Thanks for the link Art. Sometimes I fail to remember all of the various sources we have on the internet.
Hmmmm.....I just can't help it....ArtR's post could be called an: "Art-link-letter"

in Johnson 1941 Rifle
Posted · Report post
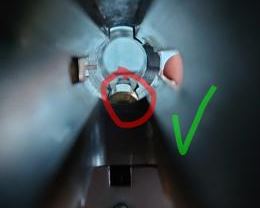
I can't believe that I didn't think of this before! THE BOLT HOLD OPEN LEVER might be infringing on the shell follower as the last round is presented to the bolt. It is at this point that the front tang/tongue on the bolt hold open bar/lever, starts to be pushed down as it's struck by the angled section at the rear of the shell follower.
Joe Scott has always advised that the front tang on a "BHO" must be fitted to each individual rifle in order to work properly. I suppose it's possible that your "BHO" needs some fitting. You could leave the "BHO" out of the rifle just to see if that cured the problem. You might have to file just a bit off that tang or change the angle of the tang that is presented to the shell follower "cam lobe"....that angled piece on the back of the follower.