
M48TANKER
Members-
Content count
609 -
Joined
-
Last visited
Posts posted by M48TANKER
-
-
eb in oregon,
and ArtR,
Thanks for the reloading info. I do have enough 30.06 once fired brass to keep me going for a while. Do either of you happen to have a "pet" load for 270? Most of my shooting is now target practice just for fun.
-
The Winfield Deluxe Sporter which I purchased from Brian Alpert, (RIP) is in 270 Winchester. I've never gotten around to shooting it. It's just too beautiful to shoot. Actually I don't have too many rounds of 270 and I want to save those for the developing war.
-
Yuccacapt343,
I'm glad you were able to make the deal. That is the nicest reproduction which I've seen and it included the recoil tube installed! That recoil tube assembly would cost nearly $300.00 alone.
I knew it wouldn't last long.
-
Another rarity has appeared, a pretty nice reproduction stock. Buy-it-now is $1000.00 and it you want it, I would definitely use the Buy-it-now option.
Link: "https://www.ebay.com/itm/125216911616?ssPageName=STRK%3AMEBIDX%3AIT&_trksid=p2060353.m1438.l2649"

-
My brother, David, is watching #5955 and we are expecting it to go much higher and out of his reach. He really wants a Johnson but is unwilling to pay $8000.00 to $17,250.00

That rifle #5955 sure has an interesting past of stock changes, barrel changes, parkerizing, etc. It will be interesting to see what the final price is.
Then #4288 which sold at auction last December, for $17,250.00 plus auction fees and shipping.
I have "several" nice Johnsons and would probably sell any of them for $8000.00 plus shipping. I have a couple of dozen Johnson bayonets to sell also at $600.00 each.
Maybe it's time to contact an auction house?

-
You've done an excellent job cleaning up that wood. Of course you know that!

-
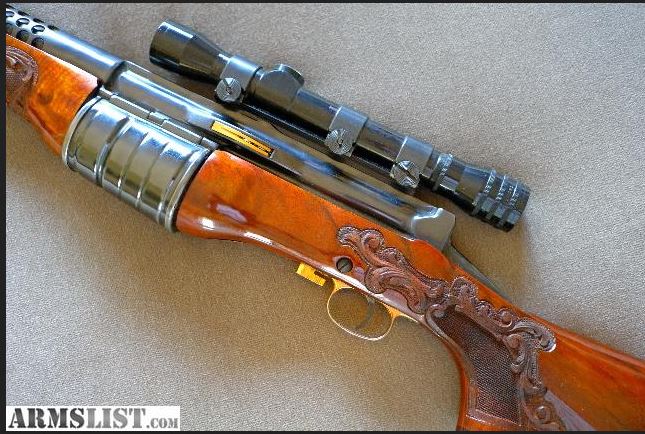
Years ago there was a Winfield Deluxe Johnson Sporter on the market with the fancy carved stock, nice scope and mount, gold plated parts, etc. I believe the story is that the gun was inherited by someone who just wanted to sell it. It had belonged to his father or uncle who lived in Alaska and used the rifle for hunting. I think Brian purchased the rifle and the rear stock got broken at the wrist in shipping, at some point in it's life. The repair didn't suit Brian and he replaced the repaired stock with the other "checkered" stock. I don't know what became of the repaired "Fancy carved stock" and I'm not sure if Brian scrapped it or not.
I ended up buying the "Checkered" stock rifle from Brian and would like to return it to the "Fancy Carved Stock" like it was delivered long ago from Winfield. I found a carved front forestock on the internet and bought it cheap. I'm still looking for a carved rear stock but I wouldn't want to buy a complete rifle just to get it. I might contact the seller and inquire if he would consider trading the wood he has for something else.
-
I'll take TWO of everything!

-
When I first got into building 1919A4 semi autos, there existed no way to "buck" the rivets to install the sideplates. Guys had just been inserting a bar of steel and backing the rivets with that. Sort of putting a steel bar in a vice and sliding the receiver over it, laying the receiver on that bar and bang away. Nobody had any tool to "set" the rivets either. Riveting tools existed mainly for the aircraft industry but none specific to the rivet heads needed on the 1919A4s.
I gave it a lot of thought
and came up with a set of opposing steel wedges which could be pulled together and tightened in the receiver by an attached threaded rod. It worked so well that I began making these "Tanker's Bucking Bar Wedges" and selling them on the 1919A4 Message Board. My equipment was limited to an old Brown and Sharp 2A milling machine, all manually operated...no computer, no DRO, just my hand measuring tools. It took me most of a day to make a set of bucking bars and I only charged for the material used in making them. I was not making a profit but I was making a lot of friends and having a great time doing it.
Then I took a "muffler gun" and reshaped on of the "bits" into a punch with a concave divot in the end to form a domed head on a rivet. I would sell the rivet tool and the set of wedges as a set or you could buy one or the other.
This method of riveting the side plates on the 1919A4 became "THE WAY" of building these receivers. I guess I sort of revived a lost art only practiced by the factories who made 1919's. In fact I'm not sure the bucking bar they used was opposed wedges?
WOOHOO! I became "famous" as the go-to-guy for riveting tools. Dolf Goldberg even included my "Tanker's Bucking Bar Wedges" in one of his books. He called and asked my permission first and I agreed only if he didn't use my real name.
Soon, one of the other members of the 1919A4 Message Board,
 since he was a professional machinist and had better equipment, was able to sort of mass produce my bucking bar wedges a lot cheaper than I was able to. I was just in this for the fun of it and did not want to compete with someone else who could out-produce me. I had not applied for a patent and he just used my design to re-create my wedges and that put me out of the game.
Morale of the story:
 Don't ever expect to make a profit on a "limited run" type of item.
-
Eb,
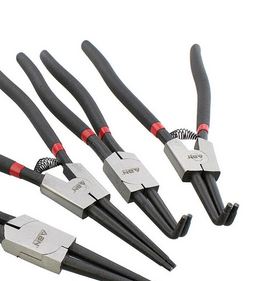
Nice wrenches. I need to make some more. Those pictures I posted of "pliers" are usually used on internal and external snap rings. I use them on motorcycles and mechanical equipment mostly. The type of spanner wrenches you posted are the best tools for firearms work.
-
I "Awakened" around 2:00 am with visions of cocking knobs spinning in my brain.
So I decided to make use of our "Gallery" feature to create some of my artwork. If you haven't checked out our Gallery section lately, you might want to do so.
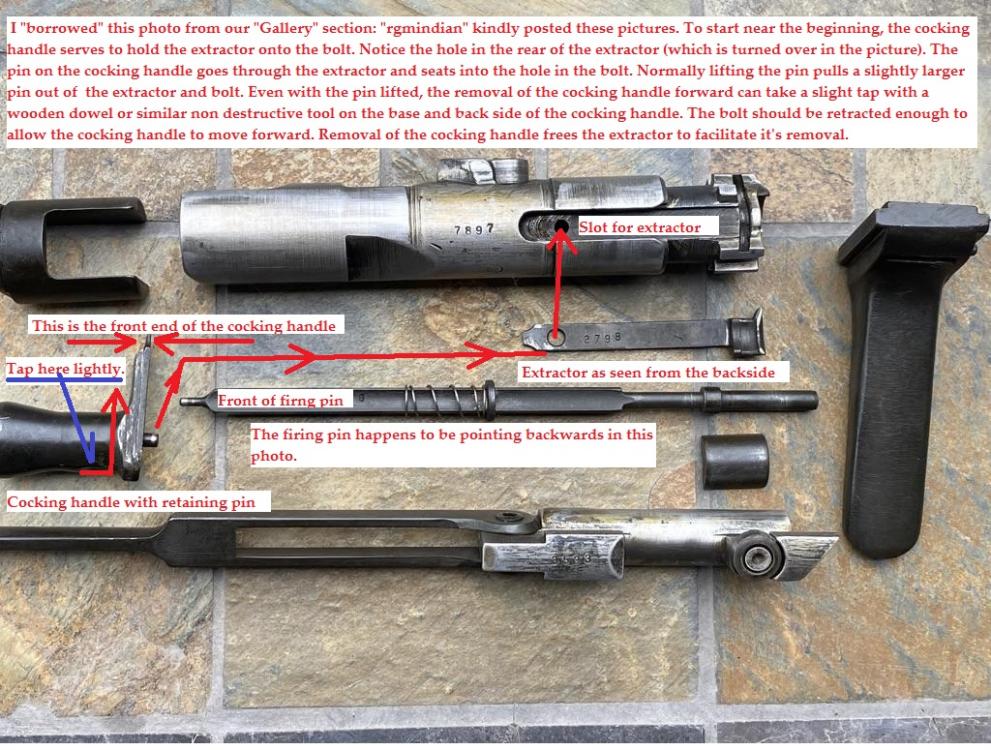
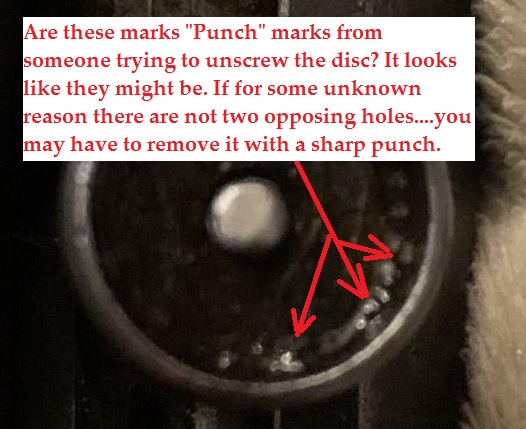
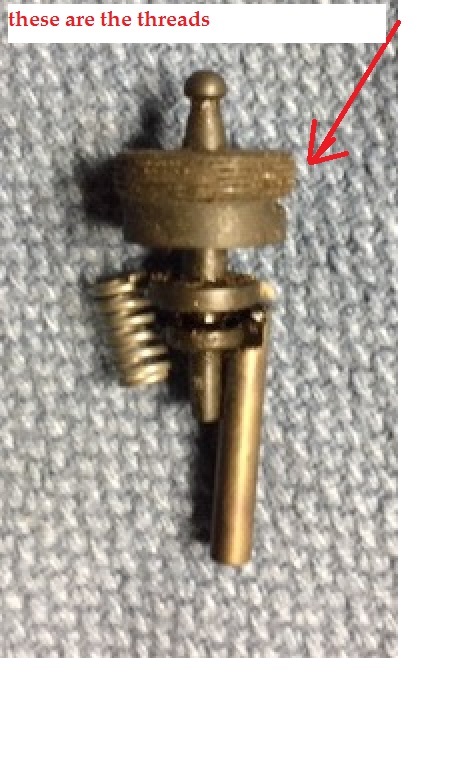
I'm very puzzled by "j.rivet's" cocking knob and it's lack of any apparent holes for removal. It had to be assembled some way and the pictures below show the most common construction. This is not to say that, over the years, someone poured lead or something into the holes, but I still think that the holes are there somewhere under whatever is covering them. I hope we get this thing figured out so I can get some sleep!

-
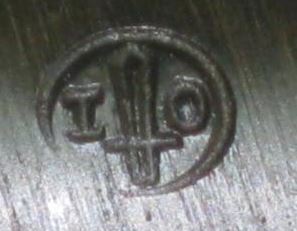
The correct part should have the two opposing holes in it. Here is a copy of camstuff's picture of the internals of the cocking knob. The threads are shown as below if you double click the image. I also found a good pic of the NPC stamp on an original barrel.
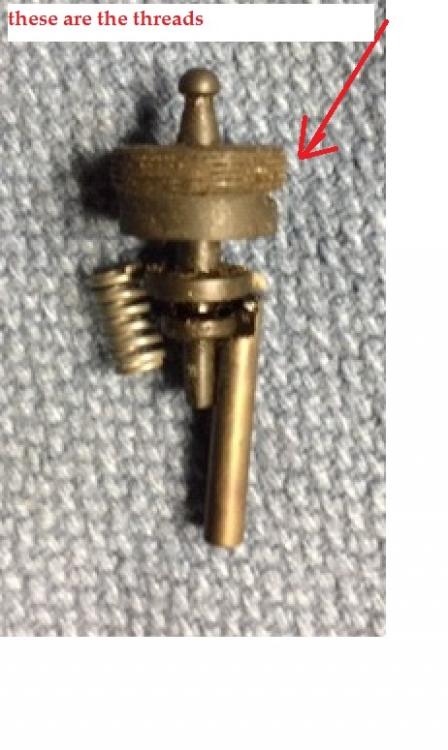
-
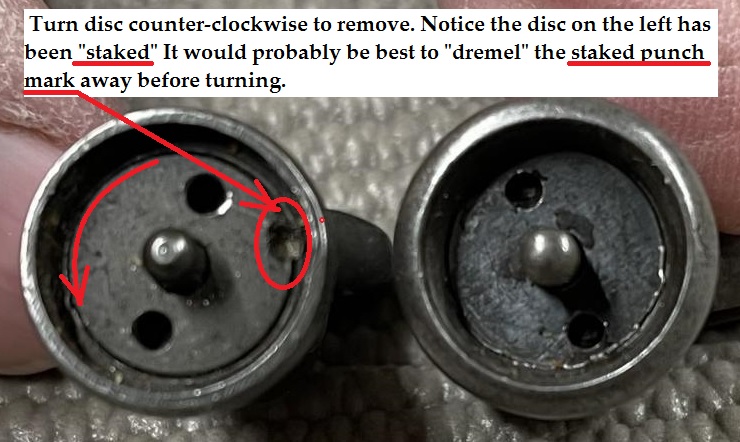
You could always take a small drill bit and make the two opposing holes in the disc so you can unscrew them. You will need some sort of tool to turn the disc. Start pouring penetrating oil in the cocking knob to facilitate the removal.

-
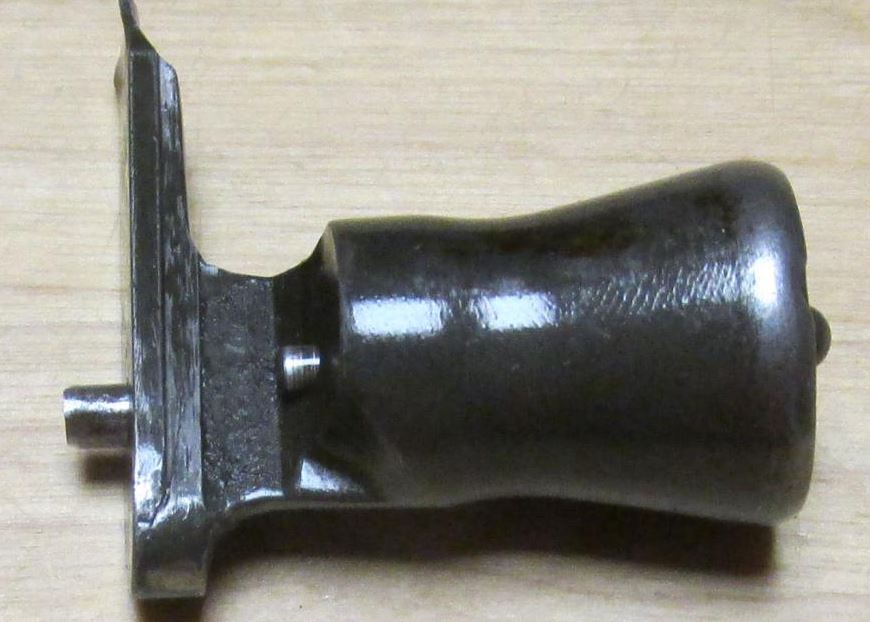
Well....alright then! Here is a photo of something I see on the place/disc which must unscrew. Perhaps along the line someone in the past made a repair? Here is what's on the backside too.
-
Camstuff has advised you correctly. Try cleaning the threaded disc that should be around the pin. Perhaps the holes are just obscured by years of grime?
I'm not sure if trying to work the pin around to get it engaged it the "lifter" again is possible.
Try very hard to do no damage. Those cocking knobs are very scarce!
-
I'll still bet on the recoil spring being too weak, not enough coils, smaller diameter spring wire, spring compression rate not proper.
If the main recoil spring checks out to be comparable in compression strength to an original or a properly engineered new spring, then I'd ask what ammo are you using? The Johnson was designed to 150grain bullets loaded to specifications. In other words 30.06 ammo equivalent to to WW2 standards. Some new hunting ammo, even with a 150 grain bullet, might have a more powerful load of power which exceeds the pressure the rifle was designed for: around 2550 psi to 2700 psi.
The spring would still be in question. Guys can order new springs made by manufacturers but only in bulk quantities, and even though it's 12 inches long it may not have the proper compression rate as an original spring. I think one seller of springs was JPeterr and I've not heard any negative feedback.There was another guy selling them but I have no reference for him.
https://www.gunbroker.com/item/923496067
The following quote is from ART:
-
Fellows,
Now I've resisted getting one of these for many years now. You all have me stirred up. So here I go on the hunt for one. Somehow I thought they would sell for more. I'll be watching Ebay for one.

-
I am deeply saddened by the news of the passing of Dr. Brian Alpert. The world has truly lost a great man.
-
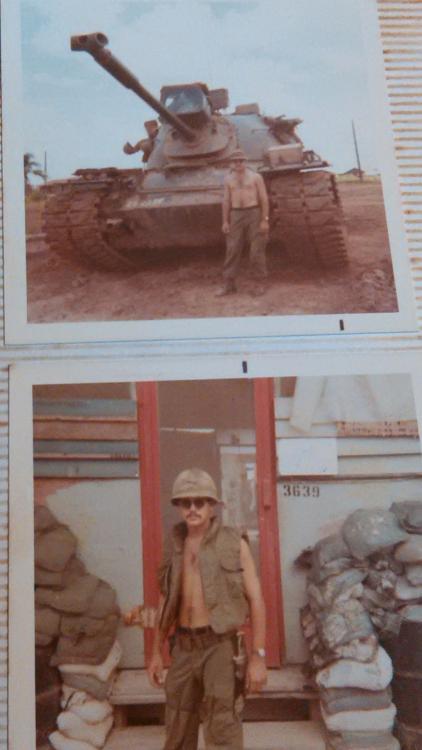
U.S. ARMY
1969/1970
Company B, 2nd Battalion, 34th Armor/25th Infantry Division
Tayninh Province, South Vietnam at the foot hills of "Nui-Ba-Den"
Gunner on an M48A3 Main Battle Tank, 90MM main gun, cupola mounted M2HB, Co-Axial 1919
-
Hey Guys,
I've used this "slide hammer" set up to remove a couple of recoil tubes. The main portion of the "tool" is just a holder for a drill bit extension that happened to fit the recoil tube. Of course the recoil assembly comes out the FRONT of the stock. This worked for the couple which I did and they were not stuck hard so your mileage may vary. My caveat is just: "Don't tear it up"
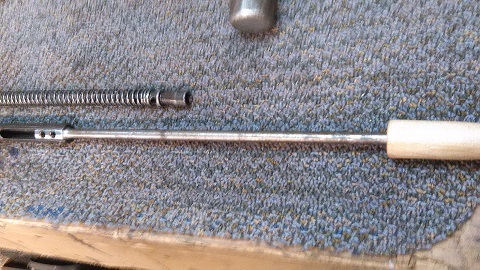
To use the slide hammer method you have to get the end cap screw out first. I ground a flat piece of steel to fit the exact dimensions of the slot of the cap screw. Then a hand struck impact driver, from my motorcycle tool box was used to gently tap, tap, tap...first in a counter clockwise direction, and then gently clockwise as if installing. Alternate removal stresses back and forth. Generous amounts of "Break-Free". Once you can get a few counter clockwise turns on it you may put a penny or other softer material to shield the cap screw from the hammer face and gently tap on the cap screw, toward the front, to break the tube free from the wood. Only tap forward as far and your threads allow, then back the cap out a few threads and tap again. stop short of damaging the last thread or two. EASY DOES IT.
And, by the way: Don't forget to remove the recoil check bar and it's screws!
-
Ed, I might be able to help. I'll send you an email.
-
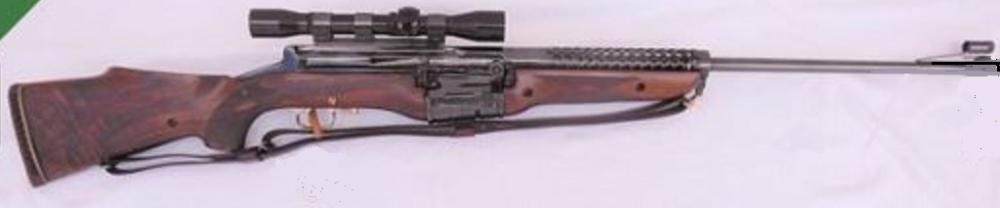
Hey Guys and Gals,
I have a 1941 Johnson, acquired from Brian, which has a checkered fancy set of wood. It's beautiful but I'd like to outfit it with the carved wood like in the picture below. If anyone has a lead on the fanciest carved wood, please let me know. I have a Military stock and forearm set which is freshly refinished to sell or to bargain with.(pictures available)
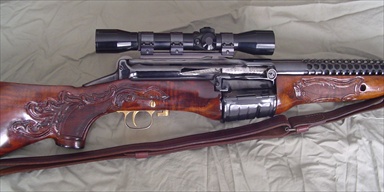
Below is the one I acquired from Brian Alpert: The checkering is beautiful in it's own right but I also want the fully carved; The picture below does not do it justice

-
RareCat,
Forgive me if I'm explaining things which you already know!
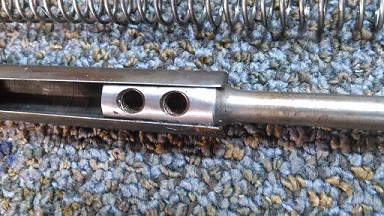
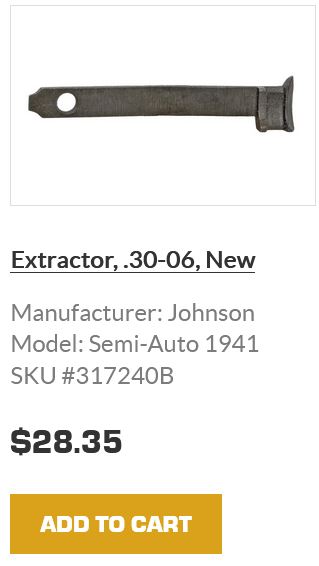
Remember "Extraction" is done by the "extractor" on the right side of the bolt pulling the spent cartridge out of the chamber. The "Extractor" is under spring tension and must be strong enough to really grab onto the spent brass casing.
Sorry for the dark picture.....it's not mine.
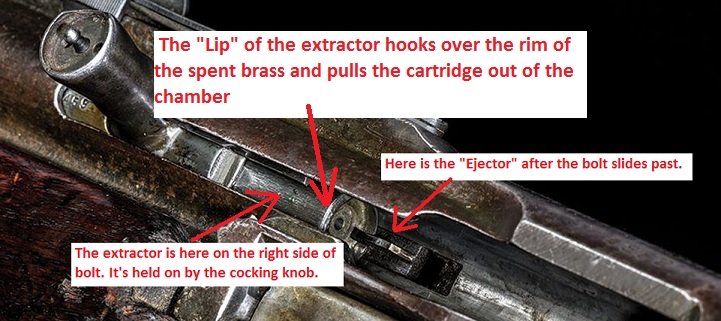
.
"Ejection" is done when the rim of the spent casing hits the "ejector" located on the left side of the receiver. You can have problems with either or both. When the chamber gets hot the brass is more likely to stick to the chamber walls when the casing expands.
Many extraction problems with the JSAR are related to the chamber needing to be polished or even honed. Check the Johnson's spent brass for any indication of a scratch in the chamber.
Mr. Joe Scott has addressed this issue many times. Looking up some of his old posts will yield several methods of dealing with this. Sometimes the chamber just gets dirty and other times the problem can be addressed by a good polishing of the chamber walls to remove any imperfections which might cause the extraction problems.
A chamber which is a bit dirty or too oily might cause sticking problems when hot. Also check the condition of your extractor. You didn't indicate exactly what the problems are, so there are several areas to inspect depending on the malfunction.
Johnsons need a good full length recoil/buffer spring in order to function properly. The spring should measure a full 12 inches at least. Most old springs "take a set" or suffer from fatigue. For example if your spring measures 11& 3/4 inches, even that could cause "overactive ejection" issues.
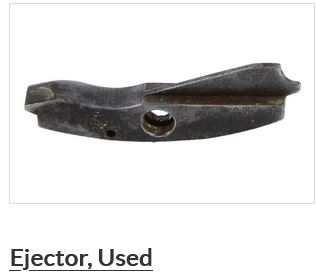
With an extractor that is in good shape and a polished chamber, your problems should be resolved. Of course don't overlook the condition of the "ejector" and make sure it's operating properly. The "Ejector" on the left side of the receiver is often overlooked and might need a good cleaning. There is a "wire spring clip" that operates the ejector with a pivot pin holding it on.
-
Hey FlightRN,
Whether it's called a sight protector or muzzle protector...I LIKE your little piece of history.
I looked for hours and couldn't find another one exactly like it. Some were close but none was exactly like yours! You may have a "One of a Kind" ? It will definitely serve well as a muzzle protector and keep DUST, mud, rocks, and worms out of your muzzle. Dust plus monsoon rains equals Mud. Are the spring loaded flaps on the right side of the lower receiver of an M-16 called "Dust Covers" or Mud Flaps? Tanks are much bigger than APCs and make a lot more dust, they also throw clumps of mud and debris. Tanks do go slower than APCs and can't outrun their DUST. Even way back then sticking your muzzle into dirt or mud was considered bad form, and was usually easier to avoid than DUST. Unless you had to "Bite the Dust" when under enemy fire.
Unfortunately I often used up my government issued supply of condoms for their intended purpose
(covering the triangle shaped muzzle device.) Anyway, my "M16" was actually marked Armalite AR-15, and was full auto. Probably one of the first Colt/Armalite AR-15s over there, aquired by the U.S. Airforce before anyone else got them? I received it as an inheritance from an NVA soldier who had no more need for it.


in Johnson 1941 Rifle
Posted · Report post
Thanks to all for the valuable information.